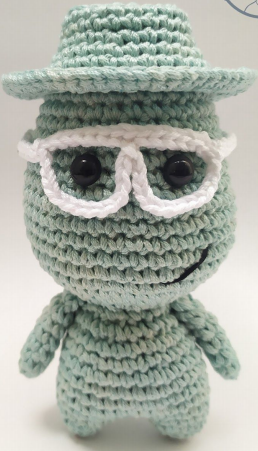
Amigurumi Joe Soul Free Crochet Patterns
Hello dear visitors, I am here again with new amigurumi molds for you. I am sharing amigurumi patterns for you here for free. You can make your children happy by making these patterns. Amigurumi toys are very popular lately and are the most beautiful toys that don’t harm your kids. Your kids will love them. Let’s move on to our pattern and give them this gift.
You will need
- 2.5 mm (or US C) crochet hook.
-100% cotton yarn (sport weight). You will need: a bluish, white, yellow and brown yarn colors. - A small portion of black embroidery thread for Joe´s smile.
- One pair of 8 mm Safety Eyes
- Tapestry needle.
- Fiberfill.
- Stitch Marker.
Abbreviations
sc = single crochet
inc = increase
dec = invisible decrease
ch = chain
BLO -…- = Back Loop Only
FLO -…- = Front Loop Only
(#) = number of stitches per round
About this pattern
- Should you use the suggested crochet hook
(2.5 mm), your Imigurumi’s final size will be
about 12 cm (4.5”) If you use a different hook
and yarn, final measures will vary. - Unless it is otherwise indicated, every round
is crocheted in continuous rounds. - The Imigurumi is crocheted bottom-up.
- To prevent little gaps between stitches in
your Imigurumi, make sure to crochet the
pieces tightly and to stuff them firmly (unless
it is otherwise indicated). - Change the yarn’s color on the last step of
the last stitch of the previous color. - Square bracket instructions must be repeated
- until the end of the round.
Legs
- FIRST LEG
With the bluish color:
1: 5 sc in Magic Ring (5)
2: BLO – 5 inc – (10)
3: 10 sc (10)
Fasten off and weave in the yarn tail. - SECOND LEG
Repeat rounds 1 to 3, but DO NOT cut the yarn.
4: To join both legs, chain 2 and join leg 1 with
a sc. Crochet 9 more sc along leg 1. Then, crochet 2
sc on one side of the 2-ch-chain. Now, crochet 10 sc
along leg 2 and finish with 2 sc on the other side of
the 2-ch-chain. (24)
You may place a stitch marker here to mark the new
beginning of the following round.
Body and Head
5: { 3 sc, 1 inc } * repeat (30)
6 – 9: 30 sc (30)
10: { 3 sc, 1 dec } * repeat (24)
11: 24 sc (24)
Stuff while you progress
12: { 2 sc, 1 dec } * repeat (18)
13: { 1 sc, 1 dec } * repeat (12)
14: 12 inc (24)
15: { 2 sc, 1 inc } * repeat (32)
16: { 3 sc, 1 inc } * repeat (40)
17: { 19 sc, 1 inc } * repeat (42)
18 – 22: 42 sc (42)
Eyes
Place the safety eyes between round 24 and
25, 5 stitches apart.
23: { 5 sc, 1 dec } * repeat (36)
24 – 26: 36 sc (36)
27: { 4 sc, 1 dec } * repeat (30)
28 – 29: 30 sc (30)
30: { 3 sc, 1 dec } * repeat (24)
31: 24 sc (24)
32: { 1 sc, 1 dec } * repeat (16)
33: 16 sc (16)
34: 8 dec (8)
Fasten off, leaving a long yarn tail. Using your
tapestry needle, weave the yarn tail through the
front loop of the 8 remaining stitches and pull it
tight to close off the head. Weave in the yarn end.
Arms( x2 )
Using the bluish color:
1: 7 sc in Magic Ring (7)
2 – 7: 7 sc (7)
Fasten off, leaving a long yarn tail. Do not stuff.
Flatten the piece and, using the tapestry needle,
close its borders with 2 or 3 stitches working
through both sides. Leave the remaining yarn tail
for sewing.
Hat
Using the bluish color:
1: 6 sc in Magic Ring (6)
2: 6 inc (12)
3: { 1 sc, 1 inc } * repeat (18)
4: { 2 sc, 1 inc } * repeat (24)
5: BLO – 24 sc – (24)
6: 24 sc (24)
7: { 3 sc, 1 inc } * repeat (30)
8 – 10: 30 sc (30)
11: FLO – 30 inc – (60)
12: 60 sc (60)
Fasten off, leaving a long yarn tail.
Glasses
Using white color:
1: Chain 14 ch stitches. In the second ch
from your hook crochet 1 slst on each cad. (13)
2: Chain 15 ch stitches, skip 5 stitches and
make 1 slst to join to the main chain. Then, chain
another 14 ch stitches, skip 6 more stitches and join
with another slst.
3: Chain 11 ch stitches. In the second ch
from your hook crochet 1 slst on each cad. (10)
4: Fasten off with a slst to join to the side
of the glasses and weave in the yarn tail.
Chain 11 ch stitches. In the second ch from your
hook crochet 1 slst on each cad. This will be a
separated piece. (10)
Fasten off, leaving a long yarn tail for sewing. Join
this last part to the main glasses with a slst. Do not
cut the yarn tail.
Glasses Assembly
Pin the glasses
Sew them with a few stitches where
the pins were placed.
Joe Soul Assembly
Sew the arms to the side of the head.
Embroider a small smile.
Sew the hat to the head.
Weave in all yarn ends.
