Amigurumi Baby Owl Free Crochet Pattern
Hello dear visitors, I am here again with new amigurumi molds for you. I am sharing amigurumi patterns for you here for free. You can make your children happy by making these patterns. Amigurumi toys are very popular lately and are the most beautiful toys that don’t harm your kids. Your kids will love them. Let’s move on to our pattern and give them this gift.
Abbreviations
Sc: Single crochet
inc: Increase
dec: Decrease
You will need
Size USD3/3.25mm crochet hook
Medium/worsted weight yarn
Sport weight yarn in White (for eye circles)
12mm safety eyes
Blunt end tapestry needle
Polyester pellets
Polyester fiber fill
Stitch marker
Head
Rnd 1 – Start 6sc into magic ring
Rnd 2 – 2sc in each st [12]
Rnd 3 – (sc, inc) repeat around [18]
Rnd 4 – sc around [18]
Rnd 5 – (2sc, inc) repeat around [24]
Rnd 6 – (3sc, inc) repeat around [30]
Rnd 7 – (4sc, inc) repeat around [36]
Rnd 8 – sc around [36]
Rnd 9 – (5sc, inc) repeat around [42]
Rnd 10-14 – sc around [42]
Rnd 15 – (5sc, dec) repeat around [36]
Rnd 16 – (4sc, dec) repeat around [30]
Rnd 17 – (3sc, dec) repeat around [24]
Rnd 18 – (2sc, dec) repeat around [18]
Fasten off
Ear
Rnd 1 – Start 4sc into magic ring
Rnd 2 – sc around [4]
Rnd 3 – (sc, inc) repeat twice
Fasten off and leave a tail
Body
Rnd 1 – Start 6sc into magic ring
Rnd 2 – 2sc in each st [12]
Rnd 3 – (sc, inc) repeat around [18]
Rnd 4 – (2sc, inc) repeat around [24]
Rnd 5 – (3sc, inc) repeat around [30]
Rnd 6 – (4sc, inc) repeat around [36]
Rnd 7 – (5sc, inc) repeat around [42]
Change color and alternate a color for each row
Rnd 8-9 – sc around [42]
Rnd 10 – (5sc, dec) repeat around [36]
Rnd 11-12 – (sc around [36]
Rnd 13 – (4sc, dec) repeat around [30]
Rnd 14 – sc around [30]
Rnd 15 – (3sc, dec) repeat around [24]
Rnd 16 – sc around [24]
Rnd 17 – (2sc, dec) repeat around [18]
Fasten off and leave a tail
Eye Patch
Start with white sport weight yarn
Rnd 1 – Start 6sc into magic ring
Rnd 2 – 2sc in each st [12]
Rnd 3 – (sc, inc) repeat around [18]
Switch to light gray worsted weight yarn
Rnd 4 – (2sc, inc) repeat around [24]
Fasten off and leave a tail
Wing
Rnd 1 – Start 6sc into magic ring
Rnd 2 – 2sc in each st [12]
(Change color, if you are following my green owl design)
Rnd 3 – (sc, inc) repeat around [18]
Rnd 4 – sc around [18]
Rnd 5 – (sc, dec) repeat around [12]
Rnd 6 – (2sc, dec) repeat around [9]
Rnd 7 – (sc, dec) repeat around [6]
Fasten off and leave a tail
Assembly
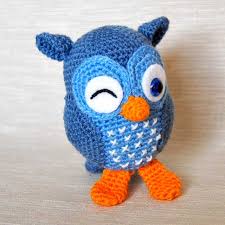
Assembly is fairly simple. Start by stuffing the head with fiber fill. Pin the ears and eye circles in place. See my picture to see where the eyes should be placed. The post needs to be pushed through the eye circle as well as the head before attaching the backing. In my example, I placed the eye post through an opening that is one row away from the center. When you are satisfied with the placement of all the parts, go ahead and sew the eye circles in place. Then reach inside the head and attach the eye backings. Next, sew the ears in place.
Fill the body with polyester pellets until it is about 3/4 full. Top it off by stuffing the rest of the space with fiber fill. This helps to keep the poly-pellets in place. Attach the head. There should be a seamless transition at the neck because both the head and body openings have the same number of stitches. The wings go on next. I usually sew the beak on last. You can also use a piece of felt in place of a yarn beak.
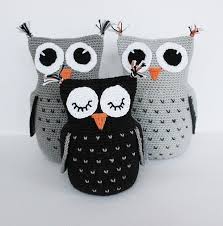
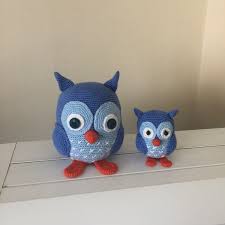
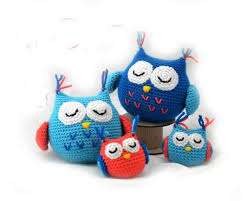
More Amigurumi Baby Owl Rattle Ideas