Amigurumi Egg Monster Free Crochet Patterns
Hello dear visitors, I am here again with new amigurumi molds for you. I am sharing amigurumi patterns for you here for free. You can make your children happy by making these patterns. Amigurumi toys are very popular lately and are the most beautiful toys that don’t harm your kids. Your kids will love them. Let’s move on to our pattern and give them this gift.
You will need
Worsted weight yarn
Crochet Hook, Size F, 3.75mm*
regular sized plastic egg
white, blue, black felt pieces
scissors
yarn needle
hot glue
small amount Poly-Fil
Abbreviations
sts – stitch
sc – single crochet
sc2tog – single crochet to stitches together, to decrease a stitch in the round.
Bottom
Round 1: Start with a magic circle. Work 6 sc into magic circle. (6 sts)
Round 2: Work 2 sc in each stitch around. (12 sts)
Round 3: Sc 1, then sc 2 in next stitch. Repeat from * around. (18 sts)
Round 4: Sc 2, then sc 2 in next stitch. Repeat from * around. (24 sts)
Round 5-8: Work 1 sc in each stitch around. (24 sts)
Fasten off and weave in ends.
Top
Round 1: Start with a magic circle. Work 6 sc into magic circle. (6 sts)
Round 2: Work 2 sc in each stitch around. (12 sts)
Round 3: Sc 2, then sc 2 in next stitch. Repeat from * around. (16 sts)
Round 4: Sc 3, then sc 2 in next stitch. Repeat from * around. (20 sts)
Round 5: Sc 4, then sc 2 in next stitch. Repeat from * around. (24 sts)
Round 6-9: Work 1 sc in each stitch around. (24 sts)
Fasten off but leave a long tail.
Use the tail to stitch the bottom and top of the egg together across approximately 6 stitches to create a solid “hinge”.
Arms
Round 1: Start with a magic circle. Work 6 sc into magic circle. (6 sts)
Round 2: Sc 1, then sc 2 in next stitch. Repeat from * around. (9 sts)
Round 3: Work 1 sc in each stitch around. (9 sts)
Round 4: Sc 1, sc2tog next stitch. Repeat from * around. (6 sts)
Round 5: Work 1 sc in each stitch around. (6 sts)
Whether you stuff the arms is up to you, since they are so small. I squeezed a tiny bit of filling in just to give it a bit of oomph.
Flatten the piece and sc together. Fasten off but leave a long tail. Sew to the bottom of the egg body.
Legs
Round 1: Start with a magic circle. Work 6 sc into magic circle. (6 sts)
Round 2: Work 2 sc in each stitch around. (12 sts)
Round 3-4: Work 1 sc in each stitch around. (12 sts)
Round 5: Sc 2, sc2tog next stitch. Repeat from * around. (9 sts)
Start stuffing the legs firmly.
Round 6: Sc 1, sc2tog next stitch. Repeat from * around. (6 sts)
Round 7: Work 1 sc in each stitch around. (6 sts)
Flatten the piece and sc together. Fasten off but leave a long tail. Sew to the bottom of the egg body.
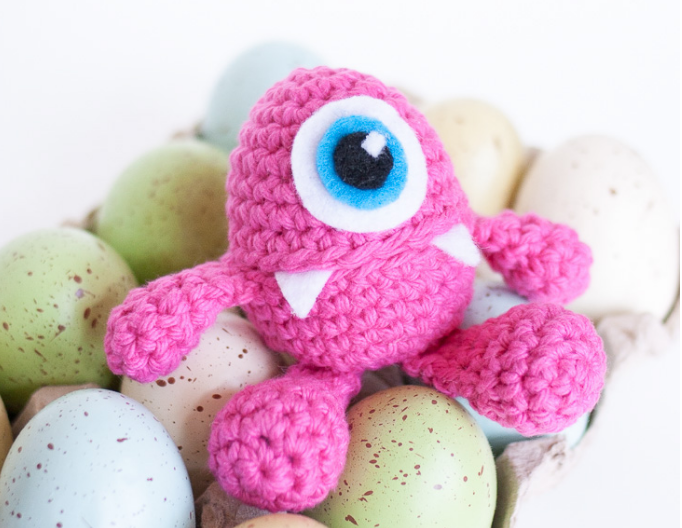
Face
- Cut out circles in white, blue and black felt. Cut a tiny piece of white felt for the “glimmer” in his eye. Hot glue the layers together to make the eye, then glue the eye to the body.
- Cut out triangles from the white felt and glue to the inside of the body for the teeth.
Finishing
Put a dab of glue on the bottom half of the plastic egg and press firmly into the bottom of the body. Also secure the edge of the bottom piece with glue. Do the same with the top half of the plastic egg. The plastic egg should be able to close tightly and open when you give it a light squeeze.