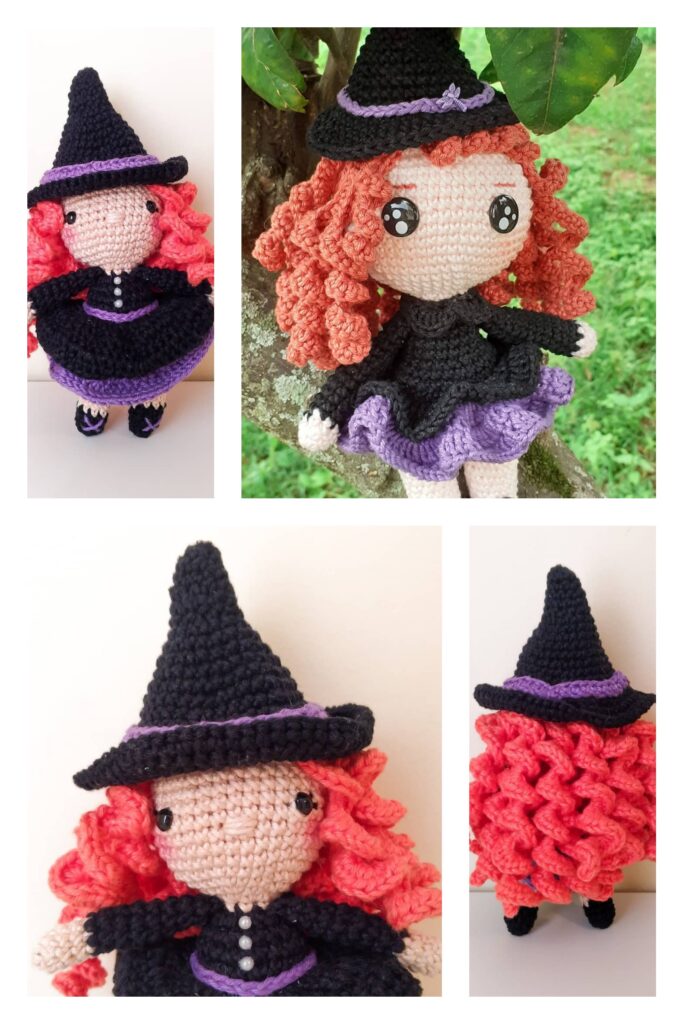
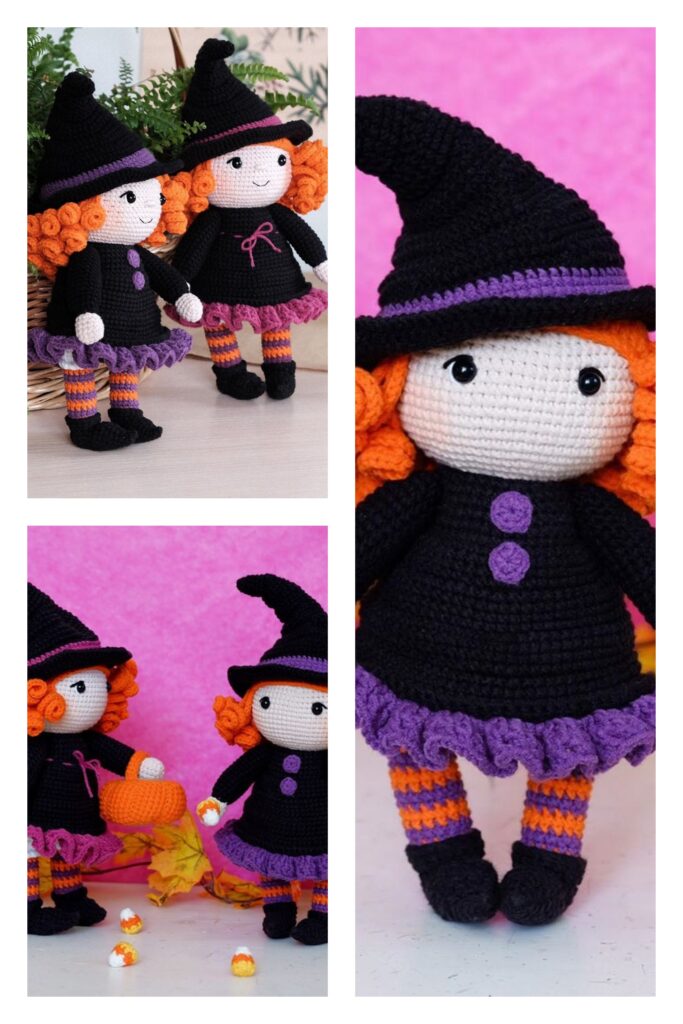
Amigurumi Regina The Witch Free Crochet Patterns
Hello dear visitors, I am here again with new amigurumi molds for you. I am sharing amigurumi patterns for you here for free. You can make your children happy by making these patterns. Amigurumi toys are very popular lately and are the most beautiful toys that don’t harm your kids. Your kids will love them. Let’s move on to our pattern and give them this gift.
You will need
3.5mm hook
15mm safety eyes
Yarn needle
Fiber fill
Yarn (acrylic, weight 4)
Black
Cream
Dark Purple
Light Purple
Orange
Abbreviations
sc: single crochet
inc: complete two single crochets within the same stitch
BLO: back loop only
dec: decrease
slst: slip stitch
ch: chain
hdc: half double crochet
dc: double crochet
Hat, Head and Torso
The hat, head and torso are crocheted together as one piece. We’ll start with the tip of the hat and work our way down.
With black yarn:
R1. start 3 sc into a magic ring [3]
R2. inc in each st around [6]
R3. sc 5, inc [7]
R4. sc 3, inc, sc 2, inc [9]
R5. sc 4, inc, sc 4 [10]
R06. sc 2, inc, sc 4, inc, sc 2 [12]
R7. sc 11, inc [13]
R08. sc 6, inc, sc 5, inc [15]
R9. sc 14, inc [16]
R10. sc 4, inc, sc 7, inc, sc 3 [18]
R11. sc 9, inc, sc 8 [19]
R12. sc 5, inc, sc 8, inc, sc 4 [21]
R13. sc 10, inc, sc 10 [22]
R14. sc 5, inc, sc 10, inc, sc 5 [24]
R15. sc 23, inc [25]
R16. sc 6, inc, sc 11, inc, sc 6 [27]
R17. sc 26, inc [28]
R18. sc 7, inc, sc 13, inc, sc 6 [30]
R19. sc 29, inc [31]
R20. sc 8, inc, sc 14, inc, sc 7 [33]
R21. sc 32, inc [34]
R22. sc 8, inc, sc 16, inc, sc 8 [36]
R23. sc 35, inc [37]
R24. sc 9, inc, sc 17, inc, sc 9 [39]
R25. sc 38, inc [40]
R26. sc 10, inc, sc 19, inc, sc 9 [42]
R27. sc 41, inc [43]
R28. sc 11, inc, sc 20, inc, sc 10 [45]
R29. sc 44, inc [46]
R30. sc 11, inc, sc 22, inc, sc 11 [48]
Switch to cream yarn:
R31. BLO: slst in each st around [48]
R32. BLO: sc in each st around [48]
R33. sc 7, inc [54]
R34. sc 4, inc, sc 8, inc 5 times, sc 4 [60]
R35 – R40. sc in each st around [60]
R41. sc 24, sc and insert stitch marker (this is the 25th st), sc 15, sc and insert stitch marker (this is the 41st st), sc 19 [60]
R42 – R44. sc in each st around [60]
R45. sc 4, dec, sc 8, dec 5 times, sc 4 [54]
R46. sc 7, dec [48]
R47. sc 3, dec, sc 6, dec 5 times, sc 3 [42]
R48. sc 5, dec [36]
R49. sc 2, dec, sc 4, dec 5 times, sc 2 [30]
Lightly stuff the hat, leaving the tip mostly empty so it can easily bend, then firmly stuff the head. Sew between the two marked stitches on the head to create indents for the eyes (see tutorial in the “notes” section). Insert eyes and secure backings.
R50. sc 3, dec [24]
R51. sc, dec, sc 2, dec 5 times, sc [18]
R52 – R53. sc in each st around [18]
Now sc 3 additional stitches. This ensures your color join will be on the back of the neck. These stitches are not included in the stitch count for round 53 nor for round 54. Move your stitch marker to the last of the 3 additional stitches and continue on with round 54 as normal.
Switch to black yarn:
R54. BLO: slst in each st around [18]
R55. BLO: sc, inc, sc 2, inc 5 times, sc [24]
R56. sc in each st around [24]
R57. sc 3, inc [30]
R58. sc in each st around [30]
R59. sc 2, inc, sc 4, inc 5 times, sc 2 [36]
R60. sc in each st around [36]
R61. sc 5, inc [42]
R62. sc in each st around [42]
R63. sc 3, inc, sc 6, inc 5 times, sc 3 [48]
R64. sc in each st around [48]
R65. sc 7, inc [54]
R66. sc in each st around [54]
R67. sc 4, inc, sc 8, inc 5 times, sc 4 [60]
Now sc 6 additional stitches. This ensures your color join will be on the back of the body. These stitches are not included in the stitch count for round 67 nor for round 68. Move your stitch marker to the last of the 6 additional stitches and continue on with round 68 as normal.
Switch to dark purple yarn:
R68. BLO: slst in each st around [60]
R69. BLO: sc in each st around [60]
R70 – R71. sc in each st around [60]
Switch to black yarn:
R72. BLO: slst in each st around [60]
R73. BLO: sc in each st around [60]
R74 – R75. sc in each st around [60]
R76. sc 4, dec, sc 8, dec 5 times, sc 4 [54]
R77. sc 7, dec [48]
R78. sc 3, dec, sc 6, dec 5 times, sc 3 [42]
R79. sc 5, dec [36]
R80. sc 2, dec, sc 4, dec 5 times, sc 2 [30]
R81. sc 3, dec [24]
R82. sc, dec, sc 2, dec 5 times, sc [18]
R83. sc, dec [12]
Finish stuffing.
R84. dec in each st around [6]
Cut working yarn leaving a tail of about 8 inches and close with an ultimate finish. Hide the tail inside the body with a yarn needle.
Arms (make 2)
With cream yarn:
R1. start 6 sc into a magic ring [6]
R2. inc in each st around [12]
R3. sc, inc [18]
R4. sc, inc, sc 2, inc 5 times, sc [24]
R5. sc in each st around [24]
R6. 4dc in the first st, sc 23 [27]
R7. sc, dec3tog, ch, sc 23 [26]
R8. sc in each st around [26]
R9. sc, dec, sc 23 [25]
R10. sc, dec, sc 22 [24]
R11. sc in each st around [24]
R12. sc 10, dec [22]
R13. sc in each st around [22]
R14. sc 10, dec, sc 10 [21]
R15. sc in each st around [21]
R16. sc 19, dec [20]
R17. sc in each st around [20]
R18. sc 9, dec, sc 9 [19]
R19. sc in each st around [19]
R20. sc 17, dec [18]
Now sc 13 additional stitches. This ensures your color join will be on the back of the arm. These stitches are not included in the stitch count for round 20 nor for round 21. Move your stitch marker to the last of the 13 additional stitches and continue on with round 21 as normal.
Switch to black yarn:
R21. BLO: slst in each st around [18]
R22. BLO: sc 8, dec, sc 8 [17]
R23. sc in each st around [17]
R24. sc 15, dec [16]
R25. sc in each st around [16]
R26. sc 2, dec [12]
At the end of round 26, crochet one additional sc in the next stitch, then fasten off and leave a long tail for sewing. Stuff the arm with fiber fill. Do not over-stuff the arm or it won’t lay flat against the body. The top part of the arm near the opening doesn’t need much stuffing at all. Fold the top opening in half and slip stitch closed.
Trim on Sleeves (add to both Arms)
With black yarn, create a slip knot on your hook, leaving a tail of about 6 inches.
R1. Starting in the first front loop of round 22 (the first black front loop), ch 2, hdc in the same loop, then hdc in each front loop around [18]
R2. slst, ch 3, do not turn, dc 2, 2dc [24]
Cut your working yarn, leaving a tail of about 6 inches, then create an invisible finish. Tie the ending tail to the starting tail with a secure knot, then hide the tails inside the arm with a yarn needle.
Legs (make 2)
With black yarn:
R1. Chain 3 start: ch 3, inc in 2nd ch from hook, 5sc in the last ch. Continue on the other side of the chain base, 3sc in the last ch [10]
R2. inc, sc 2, inc 3 times, sc 2, inc 2 times [16]
R3. inc, sc 4, inc 2 times, sc, inc, sc 4, inc 2 times, sc [22]
R4. inc, sc 6, inc, sc 2 times, inc, sc 6, inc, sc 2 times [28]
R5. inc, sc 8, inc, sc 2, inc, sc, inc, sc 8, inc, sc 2, inc, sc [34]
R6 – R7. sc in each st around [34]
R8. sc 28, dec 3 times [31]
R9. dec 3 times, sc 21, dec 2 times [26]
R10. dec 2 times, sc 22 [24]
Now sc 12 additional stitches. This ensures your color join will be on the back of the leg. These stitches are not included in the stitch count for round 10 nor for round 11. Move your stitch marker to the last of the 12 additional stitches and continue on with round 11 as normal.
Switch to light purple yarn:
R11. BLO: slst in each st around [24]
R12. BLO: sc in each st around [24]
R13. sc 11, dec, sc 11 [23]
Switch to dark purple yarn:
R14. sc in each st around [23]
R15. sc 21, dec [22]
Switch to light purple yarn:
R16. sc in each st around [22]
R17. sc 10, dec, sc 10 [21]
Switch to dark purple yarn:
R18. sc in each st around [21]
R19. sc 19, dec [20]
Switch to light purple yarn:
R20. sc in each st around [20]
R21. sc 9, dec, sc 9 [19]
Switch to dark purple yarn:
R22. sc 17, dec [18]
R23. sc 7, dec [16]
Switch to light purple yarn:
R24. sc 2, dec [12]
R25. sc in each st around [12]
Fasten off and leave a long tail for sewing. Stuff firmly with fiber fill. Fold the top opening in half and slip stitch closed.
Trim on Shoes (add to both Legs)
With black yarn: create a slip knot on your hook, leaving a tail of about 6 inches.
R1. Starting in the first front loop of round 11 on the Legs, sc in each front loop around [24]
Cut your working yarn, leaving a tail of about 6 inches. Tie the ending tail to the starting tail with a secure knot, then hide the tails inside the leg with a yarn needle.
Skirt
The skirt will be worked in rows. At the end of each row, slst, ch 3 and turn before beginning the next row. Slip stitches and chains do not count as a stitch.
With black yarn, create a slip knot on your hook, leaving about 6 inches.
R1. Starting in the first front loop of round 75, ch 3, dc in the same st, then dc in each front loop around [60]
R2. ch 3, dc, 2dc [90]
R3 -R4. ch 3, dc in each st around [90]
Cut your working yarn, leaving a tail of about 6 inches. Tie the ending tail to the starting tail with a secure knot, then hide the tails inside the body with a yarn needle.
Hat
We’ll be crocheting into the exposed front loops (the black ones – the last round of the hat portion) in round 30 of the Hat, Head & Torso.
Hold the point of the hat up towards your face so the stitches of your hat brim will end up facing right-side-out. Leaving a tail of about 6 inches, create a slip knot on your hook.
With black yarn:
R1. Starting in the first front loop of round 30, sc around in the exposed front loops [48]
R2. sc 7, inc [54]
R3. sc 4, inc, sc 8, inc 5 times, sc 4 [60]
R4. sc 9, inc [66]
R5. sc 5, inc, sc 10, inc 5 times, sc 5 [72]
R6. sc 11, inc [78]
R7. sc 6, inc, sc 12, inc 5 times, sc 6 [84]
R8. sc 13, inc [90]
R9. sc 7, inc, sc 14, inc 5 times, sc 7 [96]
R10. sc 15, inc [104]
R11. sc 8, inc, sc 16, inc 5 times, sc 8 [110]
Cut your working yarn, leaving a tail of about 8 inches, then create an invisible finish. Using a yarn needle, weave the ending tail into the underside of the brim until it is even with the starting tail. Tie the ending tail to the starting tail with a secure knot, then hide the tails inside the head with the yarn needle.
Hair
See the notes section for a video tutorial! We’ll be starting in the middle of the back of the head, working around. We’ll complete half of the long curly strands, then the bangs, then the second half of the long curly strands as we work around.
Note: The number at the beginning of each line in a pattern usually corresponds with an entire round, but in this case it corresponds with a single stitch from round 32 of the Hat, Head & Torso. There are 48 stitches in that round, meaning there are 48 exposed front loops to crochet the hair into.
With orange yarn, create a slip knot on your hook, leaving a tail of about 6 inches.
First half of long strands:
R1. slst in the first front loop of round 32 (the first cream front loop) of the Hat, Head & Torso, ch 41, sc in second ch from hook, then sc in each remaining ch [40]
R2 – 15. slst in the next front loop, ch 41, sc in the second ch from hook, then sc in each remaining ch [40]
Bangs:
R16 – R33. slst in the next front loop, ch 14, then slst again in the same loop [14]
Second half of long strands:
R34 -R48: slst in the next front loop, ch 41, sc in the second ch from hook, then sc in each remaining ch [40]
Cut your working yarn, leaving a tail of about 6 inches. Tie the ending tail to the starting tail with a secure knot, then hide the tails inside the head with a yarn needle.